read all about it :)

Summer carries on, and actually some sunny days! girls have been busy in this time. We had signed them in cor a weeks athletics camp [pm only] at local sports centre, which they v much enjoyed, finishing with a pretend olympics. I watched them on the weds try out relay, high jump and long jump. coaches v positive too all, did suspect mine not always trying…

relay race

At the weekend my aunt and uncle visited us on the way down to see their first grandchild :) we had a lovely time, and cheered on the athletics in the olympics on our new telly. BB also did lots of fimoing. she is absolutely desperate to have a pet tortoise, so decided she couldn’t bear to wait, so made some out of fimo.


on the sunday we stayed up far to late watching the closing ceremony, which we thought was disappointing really. shame when everything else had been fab!

the girls visited their grandparents on tues with DH [so no pics!]

weds was historyetc, which we all enjoyed. we are at the end of tudor, with some canadian exploration by french and english – so children used watercolours to depict scenes in canada which they woudl show back in their hoem countries. We also had the spanish armada – some writing, picture sorting and decoding for the queen’s speech with kfish and jax. cooking with zoe – paella and patatas bravas for the spanish themed lunch. also with zoe, making clay salamandars. gold ones were found on the spanish galleons to ward off the peril of fire. they possibly should have concentrated more on drowning risks…

historyetc
historyetc
history etc


historyetc

Big stayed with us from history until our summer party on saturday, when the rest of her family and lots of friends and family joined us to celebrate knowing each other :) the party is a v chilled affair, possibly this year more tea drunk than wine – to the outrage of some of the men! but there was plenty of wine and beer to drink… the sun shone v v brightly, so tarp and gazebo :) loads of scrumptious food brought to share – thankyou, and generally great company. In such sunny weather the paddling pool was a blessing and much used. many kept their mythical creatures costume on for only a short while – particularly the abominable snowman [a great choice to wear a padded sleeping bag on such a swealtering day ;) ] . we were troll – DH [costume made by BB, well done!] SB water nymph, BB fire fiend, me green woman[goddess/tree spirit etc] .


my troll :)


i didn’t manage to get pics of all the costumes, but we had fairies, handmaidens of artemis, leprechaun, flying pig, goose that did indeed lay a golden egg ;) , some vampires, a man who got around to jobs :lol: death, unicorn and siren. a few more possibly too… I loved seeing our friends from far and wide, grateful they would come all this way for a party :) and wonderful hearing happy laughter and fun from all the kids. I always think they are pretty perfect days :) thankyou everyone. Anyway more pictures of a happy day [scream if i need to remove!]


All good things come to an end, some were daytrippers and some stayed overnight for pancakes the next day [there was a time slippage!!] and then curry for lunch [more time slippage] but finally house empty. always feels v v empty after a party. nice chilled day tho chatting in the garden with good friends. thankyou.

welcome to a new family member

I am very happy for my cousin and wife and their beautiful baby girl, who was born Saturday 4th August, welcome to the family little one :)

catch up crazy!!

we have been having a great summer here [despite contrary weather!]

highlights so far:
nephew and niece coming to stay – lots of crafting, baking and some science experiments. we went to see ice age 4, and decided we were a herd ;) I am ellie, dh is Manny, SB is peaches [scary!] BB and M are the possums ;), E is the white tiger and her dad is diego. none of us thought we would be sid! we really enjoyed the film. DH arranged for us to go camping v close to home, so that i could commute to work – lol from a tent! – and on the weds [my day off] we hired canoes, it was utterly fab. that one day felt like a whole holiday :) . we also had a surprise birthday tea for M on his last night :) loved having them, and fairly sure they loved being here :)


the following weekend went down to mum and dad’s. we watched the opening ceremony alltogether, the girls allowed to stay up [tho they did fall asleep] it was fantastic :) we could really feel the olympic excitement rising. we watched some olympics the next day and then had a walk along the thames. decided we really should have tried to get rowing tickets too!


following week we got a bit olympics mad ;) and after the telly blew up, we now have a big flat screen!! [stopped me buying a viol anyway]. have loved the olympic vibe! we applied for loads of tickets in the first round and failed, so in second round applied for basketball as it was in the olympic park. basketball was on friday, so all week we were winding up to going!

weds, as a bit of a last minute thing, we arranged to meet Jax at Wicken fen. had a great time, Big and SB loved spending time together, being nearly teens, BB missed small :( but jax and i had a good natter – always nice, and the kids needed minimal intervention, all being happy :) .


and then friday was olympics – let us just say wow! it was brill, atmosphere electric, the getting in and amenities olympic park were fab. it was all easy and just wonderful. look at bb’s beaming face. everyone had a beaming face :)we watched basket ball and had a picnic and heard the woahs and oohs from olympic stadium over jess ennis and her high jump – it was on the park monitor screen anyway :) . a wander around and then went home late afternoon. we were pooped! as had to get up at 4.30!! what a fab day :)


the rest of the weekend were were shattered :) so did crafts and science kits. bb was v v happy to make an electronic radio – with v little help from me. and it worked :) SB did some electronics and then animation. we watched olympics in background :)


wodensmeet and other stuff :)

Time doesn’t stop still, even though we rewound it to go to Kentwell! coming back both dh and i had lurgies [ho different] from which we are still recovering [too much rain, dampness and smoke doesn't help] so the beginning of the week the kids got to stay in bed late, lego/read as they wished :)

weds was our wednesday meet. depleted somewhat as em also suffering from post-Kentwell lurgy, and Merry left early. we planned crafts in the morning, and science in the afternoon, so when we set out we started with a make your own rubbing pic – the girls built up a picture from cardboard on a base sheet and then rubbed over the top. following on from that we did a felt craft of a naive style pic – eminently suited to felting


BB didn’t fancy felting – she is not a sewing fan currently, so read me very nicely and easily a level 5 songbirds book. SHe is really ‘getting’ reading now, and I can feel the steady increase in pace of learning, which is fab as she has always loved books.

After a bit of craziness for lunch and a visit to the park, we did science as one group [as only 4] which talked about conservation of energy and transferring energy between types. They all got this, and happily set too designing their own experiments to show different types of energy being used and conservation… it all involved fire ;)
BB's science experiment p's science speriment
sb crazy science experiment design!

The in a non raining moment they went out [well, also except S who was sewing madly being caught by the muse :) ] and helped each other turn those designs into reality with much laughter and enjoyment.

We have now finished the physics real science for kids, so i will sit and think what to do next, whether the biol, or move onto something that is more mix and match. [parents, let me know preference!]

[amazon affiliate, percentage of a click etc]

so we had a lovely time, the girls then did some french, played just dance on the wii, ate pizza and we returned for judo. Thurs was multisports in the day with the local home ed group and then a judo comp – BB decided not to – and SB won gold medal for her class :) :) woohoo SB :) the second good piece of news, as we had heard she had passed her grade 3 clarinet. Fri should have been arts award, but DH car broken :( what with mine having MOT and service on weds, and the family car needing a fix it has been a v expensive car week :( and the fridge is broken :( :(

This week I have been in alot at work, so not enjoyed as much of the girls company as i would like, so we did remedial crafting today ;) [tho i had hoped to make bath bombs and soap balls we did tile painting at their request]

Also played board games together and had snuggling moments :)

Also this week I took an especial time out to remember the joy and blessing of having had my lovely sister Vivien, the family members that have left us, and those that remain to us. My parents have returned from hols to Canada – great :) and in a fortnight my nephew and niece come to visit. Blessings indeed.

Kentwell Tudor re-enactment – the end of the process

or perhaps still the start :) I did mean to get a photo of the 4 of us together as a family album, and next year I absolutely will!! [and think all the families i know and am getting to know can have family portraiture too :) ]

We prepared as best we were able and a late and v v stressfull finish from work saw us en route for Kentwell, a bit late and putting tent up a bit late also, but still there, and not raining! The not raining state didn;t last long :( and in truth, the week was made very muddy by the rain that seems to appear inevitably when we put our tent up! having laid things out the night before, there was still a bit of a panic getting to breakfast and to station on the sat, and meeting the last weeks station ppl and feeling a bit spare part-ish! however, there was a lovely family in there whose dh on woodpile like mine, and some lovely families arrived and some teens that became my daughters-for-the-week and i got stuck in!

DH took a while to settle as not so well, but think he enjoyed the week, and certainly by the end was having a good time – in the carry your wife competition he carried around 2 young maids – crazy! BB settled in, and mostly was fine, we did play some games, and i would have to think of more that she could enjoy and do another time, but she did like going to market and dairy. she also enjoyed barnschool [tho was a bit of a truant!] and did enjoy the trip round that they managed to do :) being able to escape up to the cott loft for illicit snacks – mostly nectarine – kept her going :) She also enjoyed making the cotts ship for the moat race – and it stayed afloat! SHe had a possie of friends that she played with – mostly boys, mostly running, ball games or mock fighting!

SB just loved it, it was everything she hoped it would be. she loved being a peddlar, she loved having control of her station in the alehouse, and she loved joining the players to learn dances. SHe also got the opportunity to join the tentry with a lovely lady naed bess lending her a gown. it really suited sb, she had a nice poise and movement, and is obviously a born gentry :) . in the evenings she had friends old and new to play, chat, mooch with [as she is approaching teenage mooching!] she can’t wait to go back.

Highlights for me – i did enjoy older daughters, and pleased to make one a coif. i felt i grad got the hang of some of the timings on an open fire! i enjoyed doing the cott challenge with kfish, and think we had more entrants and more fun than i had expected [had thought it might fall flat!] when stations were asked to tell us their most unlikely hobby – the woolshed and their extreme synchronised motorbike team won :) . ‘selling’ names for the boat and horse racing was also fun. i enjoyed talking to people and interacting. the ceilidhs were great – even if a bit rainy :) and meeting new people. i do wish i had managed to get up to the merchants hall etc, and only towards the end did i get the hang of begging and bartering to other stations – serving bowls and ladles for the cott!

will we do it again?? – yep! so have a sewing list for another year!! it is very difficult to cold turkey from kentwelleese though :)

Happy Birthday dear sister

PB080012
IMG 4469
IMG_6319
IMG_0012
100 1171 edited-2
always loved, always missed, always remembered.

Each year, around your birthday, i am doing something new and fun with my family. Last year we did whitewater rafting in Canada, and this year we re-enacted tudors at Kentwell.

you should be here, loving your children, loving mine, and part of our living family. i still can’t believe you are not, and then huge impact crater that losing you has had. Wishing we could hug, bicker and laugh still.

I miss you x x

Making Kentwell clothes 10 – tudor jerkin

I wrote this post originally in May 2012 after we had been accepted as participants for Kentwell in their summer recreation. I only bought the wool after this point and had completed the linens previously. Buying wool for the novice is a bit of a minefield. Kentwell have elves you can send snippets to. I bought mine and SB’s wool from 2 different elves, BB and DH from a friend. colours, textures and weaves are all important. Bernie the bolt is a reliable seller of suitable wool. we were advised that the colour had to be on the farrow and ball chart, but browns, ochres, hint of sludgy greens should be more evident than they are. I had planned to be sludgy green or brown/russet. it didn’t happen that way! Wool is expensive, I was happy to do linens without knowing if accepted but wanted to be accepted before buying wool.

I had a lot of angst with this jerkin, having been told to make a jerkin I initially based the toile on one in a tudor tailor, but the costume elf I was communicating with said it should be sleeved, and then finally that it should be long skirted with pleats. I did this, but then it was knife pleats. so finally we agreed a toile shape and I got going. Jerkin was my new swear word! I am not entirely happy with it, think a fuller skirt and box pleats nicer, but it did pass costume check. Anyway, I should show the stages!

This was one of the last things I made for 1556, as I wanted it all done by the second open day in May so I had time to put things right. i recommend for anyone else making for Kentwell, communicate with the elves and make intime for the open day. Possibly a jerkin would be a good item – at least the toile – to do at a costume making weekend that they run, as it would have been far easier to make with an elf near rather than do a bit and send a pic and wait. I a overwhelmingly indebted to the costume elf that bore with me and helped :) with endless photos etc.

NB Anyone thinking of making clothes for re-enactment, please check with your group the ‘rules’ on materials, colours and look. different tudor years have different styles – particularly for men. following these notes does not guarentee acceptance of clothing by Kentwell or any other group, but may help a total novice such as myself. I had never made any clothes before these – a hint of my novicitude.

let me just say again, this is the item of clothing I am unhappy with, and you will see why!

Material

This was to be a nice warm layer, and I was short of wool, so made this out of a reasonably thick [possibly too thick] blanket which we hand dyed with terracotta and brown.

The toile and the body

i have numerous pictures of toiles, none of them right! this is the last one sent to the elf, before we worked out we were at cross purposes and life became easier, i ‘got’ what i needed to do and then got on with it! really only the body needed to have a toile, to make sure it fitted, the skirt was to work out what she wanted – ie not that!

longer length toile

making the body part of the jerkin was then easy. it is identical in steps to making the body of the kirtle [tho obviously not the same pattern!] so i sewed up all the linen lining along side seam and I did the same for the wool outer. I then placed them right side to right side and sewed them together at armholes and neck holes, leaving along the bottom unsewn. I tacked the front closed, so I could readust at the end [i am not confident enough in the toiles!] however, if you see later, I should not have sewn them together at the armhole!!

Adding the skirts

the skirts need to be cut on a bit of a curve rather than a straight rectangle like kirtle skirts can be. this is a bit of a nuisance, so i redrafted the toile linen above into a gentle curve and realise now it is quite short – and i am getting low on linen! however, friendly elf says skirt may be unlined – phew – so it is :)

I pin the jerkin pleats onto the linen lining of the jacket just like i did the kirtle skirts – so that when you turn you have sewn to the linen lining seam allowance and turn this upwards with the wool. I pinned a number of times and was not entirely happy withe the pleats as the wool strip was too short. I should have cut in half at the back and placed in a panel of identical wool at this point so I could get the pleats right, but I was tired and fed up with sewing, so didn’t. wish I had! ANyway, they are knife pleated to the back with a box pleat there in the centre. there are less pleats at the front [and i think some day i am going to have to fix this]. I then flipped the wool down over the top, folded under the seam allowance pinned in place and had a look.


hmm :( the waist line is too low, and DH now says he can’t do the jacket up where he is supposed to, so the skirts look like curtains for his codpiece. this is not good! we have a discussion, he agrees he can do it up so the skirts meet in the middle – phew! [in part because i suggest once on the manor he may not need to actually do the thing up at all ;)

i don't like jerkins

but i do raise the waistline, and then sew all together with back stitch [2 rows for strength], and before dh can change his mind, i close the front at the tighter fitting :)

The sleeves

Not only did I make a hash of the skirts, I also made a hash of one of the sleeves. I made the sleeves wider at the top than the kirtle sleeves, but to essentially the same pattern and certainly the same steps for sewing on the lining. then I placed 3 pleats from the top towards the back of each sleeve. Here I learnt something new – for fitted in sleeves, DO NOT sew up the armhole in the body like you do the kirtle, and DO NOT sew the sleeve inner and outer together like you did for pointed sleeves – sigh! because if you pleat them, it is going to be really difficult to whipstitch sleeve to body nicely. However, I had done that, so i did whipstitch the pleats firmly, then whipstitch the sleeve to the body in 2 layers – linen to linen and wool to wool. One arm was fabulous, one I redid 3 times, had enough and decided it needed a cover story, so cut out a bit and cobbled together – my dh is a woodsman, he tore it in the woods, and that was the best repair i could do ;)

jerkin sleeves


when I tried it on – and showcased the rubbish arm – i thought it would do, and it was really comfortable and snuggly warm :)

if it did up, i'd wear it ;)

finishes – buttons and buttonholes

buttons are made from the material in circles drawn tightly together, and the buttonholes had blanket stitch to hold them, as this blanket is quite felted and won’t fray and the linen within a wool envelope as the turnover was large. I did a decorative balnket stitch finish to the arms [to make up for it being not so well made]

Buttons
Buttonhole
Sleeve trim

the reveal

It was fine, he wore it alot all week, it looked better after an iron :) I think I will discuss with an elf whether to put on a black border along bottom of skirt and then at the front either side, so i can make the pleats at the front better. I don’t have enough material to put in a panel at the back of the skirt any more – which would be a better fix really.


Making Kentwell Clothes 9 – a variety of hats :)

I wrote this post originally in April 2012 after we had been accepted as participants for Kentwell in their summer recreation. I only bought the wool after this point and had completed the linens previously. Buying wool for the novice is a bit of a minefield. Kentwell have elves you can send snippets to. I bought mine and SB’s wool from 2 different elves, BB and DH from a friend. colours, textures and weaves are all important. Bernie the bolt is a reliable seller of suitable wool. we were advised that the colour had to be on the farrow and ball chart, but browns, ochres, hint of sludgy greens should be more evident than they are. I had planned to be sludgy green or brown/russet. it didn’t happen that way! Wool is expensive, I was happy to do linens without knowing if accepted but wanted to be accepted before buying wool.

NB Anyone thinking of making clothes for re-enactment, please check with your group the ‘rules’ on materials, colours and look. different tudor years have different styles – particularly for men. following these notes does not guarentee acceptance of clothing by Kentwell or any other group, but may help a total novice such as myself. I had never made any clothes before these – a hint of my novicitude

For making the first hat, i relied on following this webpage , for the next hat I used what I had learnt and simplified a bit, and for the final 2 hats I did something completely different :)

Materials

DH hat was the first one made, as the one that definitely had to be done. We had dyed an old blanket with a mixture of terracotta/brown [i think] to use for jerkin and hat. For BB’s I used some much lighter denim blue wool that i had left over from making my wool apron – lighter wool is far far easier to use with the original pattern! And for mine and sb’s in a different design I used ‘loomstate [ie undyed] blanket of pure wool. SB had hers dyed a fetching sage green by the dyers at kentwell.

DH hat
so using the above hat guide, I marked out the crown hole and the edge of the brim with tailors chalk. I cut out two of these in the wool i was using [which i felt sufficiently thick not to do all the layers of the instructions! and I cut one out of buckram.
dh tudor hat

you can see when I pin the 3 bits together that the buckram had negligible seam allowance. here it is wool/wool/buckram, so that I can sew all round with backstitch encompassing all 3 layers. i then snip triangles in the seam allowance and turn over the outer wool layer


so if you are wondering why a seam has appeared, it is because when i placed the hat on dh head, it fell down to neck, so i made the hole smaller by cutting out a segment! however, it did end up a bit tight, so they were prob right… anyway, here is the crown portion [needing an iron]

I cut out 2 circles – one in the wool and one in linen lining and then roughly sewed with running stitch all around the outside of these and pulled tighter to pleat so same size as head hole. the first time when i roughly placed this in there was far far far to much pleated material, and massive puffiness to the hat, so i reduced the diameter of the circle by 2 inches and resewed.

I also went back to the crown and turned over the wool on one side, tacking it to the buckram to hold it down.

I made linear cuts in the seam allowance on the other side of the wool crown and then pinned the crown to this and made sure i was happy with the result before sewing together. i then trimmed off seam excess and went over with bias binding. this is thick wool and pleated, so it was tricky!

I ladder stitched the brim on the otherside to the crown to make secure. hat still a bit puffball, but did look well. I am debating adding a braid to the hat.


BB hat

i made a narrower brim and less excess for the crown – learning from above. this was much much thinner wool, and consequently a far easier and simpler hat to make. i followed the same steps and had done within the hour. where i tacked on the bucram this time i did a backstitch visible on the outside, planning to cover with braid – as yet not done!


SB hat

In making this, I was being very sparing and using the end of the blanket that i had made my jacket from to make sb and mine hats. there was therefore not big pieces to be cutting out lots of large rounds, so I cut out the shape of the brim in paper [having measured SB head and got the diameter from that] and then used this to make one circle for the crown for each of us of the same diameter as to the outside edge of the brim.

emergency woolen hat for DD1


nice crown

for this hat, instead of making 2 brim pieces, you need 3, so that you sew 2 brim pieces together [with or without buckram stiffening in the middle] and the third brim piece to the crown, and then finally sew the crown brim piece to the brim. However, I did not have enough material to cut 6 brim pieces [3 each] in a nice big circle, so I divided all the brim pieces into quarters, and cut out 12 each – remembering seam allowance. This fitted on my material.


this is going to be fiddly :)

i sewed 4 quarters using back stitch to make a complete circle, and did this for each of the 3 layers.

sewing the brim quarters

i pinned two brim pieces together, right side to right side and then sewed all around the outside edge at the seam allowance. If i was using thinner material, this is where I would have sewn in the buckram ring also [like the hats above] but i felt that this was a soft cap, and the material was thick enough. When I had sewn all around, I trimmed the triangles in the brim and then turned right side out and ironed so it lay well.

pinning the 2 brim main pieces

and turning rightside out

i then took the third piece shaped identically to the brim, and pinned it right side to right side to the crown and sewed around the seam allowance at the outside edge, cut triangles into seam allowance and turned right way around. Iron it – i didn’t and wished i had, so did iron the next one!


i then joined the crown portions to the brim portions. This was done by sewing with back stitch the free inner edge of the crown to the LOWER inner edge of the brim, leaving the upper inner edge of the brim free currently. in these pictures I have pinned it on. you can see when I turn the hat over, so the top [crown] is on the bottom, that I am sewing the crown to what is now the uppermost bit of the brim [which will be the lower bit when the hat is perched on a head]


And we are done :) though would be better ironed! I think the look with quarters was fine, and in fact would be fine to quarter the crown also if needed to fit a final bit of material.

Making my Kentwell clothes 8 – hose for DH [mid tudor working mans]

I wrote this post originally in April 2012 after we had been accepted as participants for Kentwell in their summer recreation. I only bought the wool after this point and had completed the linens previously. Buying wool for the novice is a bit of a minefield. Kentwell have elves you can send snippets to. I bought mine and SB’s wool from 2 different elves, BB and DH from a friend. colours, textures and weaves are all important. Bernie the bolt is a reliable seller of suitable wool. we were advised that the colour had to be on the farrow and ball chart, but browns, ochres, hint of sludgy greens should be more evident than they are. I had planned to be sludgy green or brown/russet. it didn’t happen that way! Wool is expensive, I was happy to do linens without knowing if accepted but wanted to be accepted before buying wool.

I went to a Kentwell Costume weekend for help making DH hose so that we could get them right, as this is a serious comfort/strength thing, as you want to be able to move about without them ripping! we had great help from the ‘costume elves’ there. currently googling mid-tudor men kentwell btings up the costume notes

NB Anyone thinking of making clothes for re-enactment, please check with your group the ‘rules’ on materials, colours and look. different tudor years have different styles – particularly for men. following these notes does not guarentee acceptance of clothing by Kentwell or any other group, but may help a total novice such as myself. I had never made any clothes before these – a hint of my novicitude

The materials

wool from a friends stash in light beige/neutral which was overdyed with olive – the wool didn’t take the dye well, so is very light! blue linen as lining. there was a bit of stress about blue for the lining, as it is not a boy colour. i had no other with me, and persuaded that it wouldn’t be seen at all ever, but that if a prob, would prefer to make up and then dunk all made in an olive dye bath again. so we used blue – phew :)

measure and toile
we measured up and followed the kentwell costume notes for knee length hose making a paper pattern for the first time! the toile from an old bit of calico, making 2 of the legs from the paper pattern and joining so could see whether we had a good fit. we found that there was too much ease, so took in the pattern by 2 inches – if you follow the pattern, you may also find too much ease in the width.

DH hose

we then used our modified paper pattern to cut x 2 legs in linen and in wool. our wool was v stretchy, so didn’t need to be cut on bias – which was a relief as actually couldn’t fit in on bias. However, if your wool not stretchy, do cut it on the bias, it needs to be able to stretch to sit down. the J curve to the left there is the front, and the right hand side is the back. the seams are up the inside leg.


so having 2 legs in lining and 2 legs in wool both separate, we sewed the 2 lining legs and then the 2 wool legs up the inside leg seam, cut snips and ironed flat so that they would sit well.

then comes a bit of magic, and we sew the 2 wool legs together and then the 2 linen legs together. to do this we placed one wool leg inside the other with right side to right side. we sewed up all the back, but just to an inch infront of the inner leg seam [see the pinning], leaving the rest unsewed., pulled the legs out and snipped and ironed.


After that we put the linen and the wool together, this time wrong side to wrong side but with the linen rightside outermost. I turned over the top of the wool and stab stitched a canvas strip underneath it – this will make it firmer for eyelets.


I then folded in the linen and sewed that all around the top, and then pinned in the linen and wool around the front opening of the hose, and also sewed them together to finish around the top.


the hose were then turned around the right way, and at the legs [just below knee] i turned in the wool and linen and sewed those together to finish around the hose.


The codpiece

it doesn’t end there though. 1556 is a codpiece year – sigh! I used Magot who wrote the mediaeval tailors assistant’s helpful drawings on making a codpiece. the wool part is of 2 pieces cut together that have a triangle with then a bump on them. sew them together along middle and bump, turn right way round and stuff, then sew this onto a linen backing. sew around the base of the ‘member’ so that the stuffing [linen scraps] don’t fall out and see what it looks like.
toile for a codpiece?


It was a lot too small, more of a ‘mousepiece’ and DH thought he might get teased on the woodpile, so i made it bigger ;) and relegated the other one to use as a pincushion.


that’s better! Much more of a manly look to it – approved!


It is sewn on at the bottom and a small way up the sides to stabilise it, and then has points at the top corners to hold in place. it can be further stabilised by sewing all the way up one side [though not tudor]

better seen in codpiece made for a friend

I made 2 versions – mouse and man, he wore man ;)


Codpiece mark 2 for friend codpiece

eyelts for points were then added in pairs [6 in total] around the top of the hose to match with the pourpoint, which i now hemmed and eyeletted. also 2 pairs across the top so that the hose meet nicely – there is allowed to be a gap here.

He is a lumberjack :)

Making my Kentwell clothes 7 – kirtles for the girls and I = 3 versions of making

I wrote this post originally in April 2012 after we had been accepted as participants for Kentwell in their summer recreation. I only bought the wool after this point and had completed the linens previously. Buying wool for the novice is a bit of a minefield. Kentwell have elves you can send snippets to. I bought mine and SB’s wool from 2 different elves, BB and DH from a friend. colours, textures and weaves are all important. Bernie the bolt is a reliable seller of suitable wool. we were advised that the colour had to be on the farrow and ball chart, but browns, ochres, hint of sludgy greens should be more evident than they are. I had planned to be sludgy green or brown/russet. it didn’t happen that way! Wool is expensive, I was happy to do linens without knowing if accepted but wanted to be accepted before buying wool.

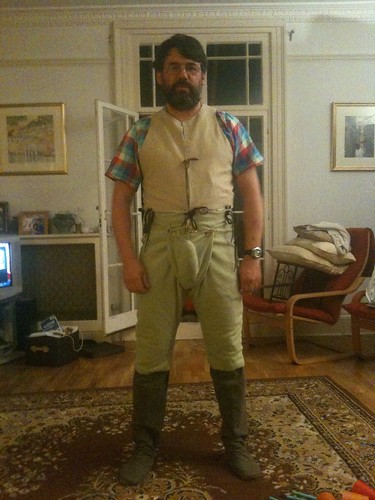
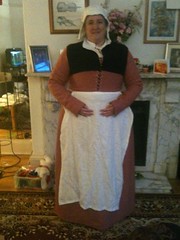
I used for my reference the Tudor Costume pages by Peronel, the Kentwell costume notes and also a bit of tudor tailor book. This means that the steps detailed here are not originating from my brain, but mixed from the others, though some of the mistakes and how to avoid unfortunately did :blush:.I made the kirtles in essentially 3 different ways. please be aware that since I have a boned bodice on my petticoat, i did not need a boned bodice for my kirtle. If you don’t have a boned bodice in your petticoat, you will need something in your kirtle and will have to look at the sources for how best to do that. I had quite a number of compliments on my ‘tudor shape’ despite being a big size, so would recommend it for those of a larger build. Boned kirtle bodices is something that i would have gone to a costume day to do. [obv i went to a private costume help for the petticoat bodice, and am v grateful for the help]. consider my blogs an adjunct to help elsewhere rather than a text in themselves.

NB Anyone thinking of making clothes for re-enactment, please check with your group the ‘rules’ on materials, colours and look. different tudor years have different styles – tho less so for poor, especially poor kids. following these notes does not guarentee acceptance of clothing by Kentwell or any other group, but may help a total novice such as myself. I had never made any clothes before these – a hint of my novicitude.

Materials

I had 2m of blue wool for bb, from which I got all the kirtle including sleeves and some spare, and I had 3m for BB, with enough spare to replace sleeves or bodice if required. I had 4m for myself and also left over enough to replace bodice or sleeves. most average size women will not need more than 3m. You also need an identical amount of linen to line – BB was lined for bodice and sleeves in the blue lining of her petticoat, SB and I were both lined in green linen in entirety.

Dd2 kirtle my kirtle Dd1 kirtle

Method 1 – BB’s kirtle

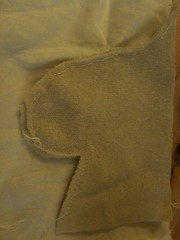
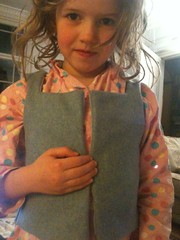
BB was hard to make a toile for, she is 7, she doesn’t like being still, she doesn’t see the point and she dances about. SO i did a very quick version toile, hoping to catch the essence as being only 7 it doesn’t have to be so tight fitting. The kentwell advice is for kids to have the waist slightly higher as it doesn’t impede movement so much. it also suggests interlining and supporting bodice. However, since BB wool thick, i decided not to bone but did add a canvas interlining. Having made a rough toile and then marked out in pencil better shapes, i did another toile in the lining linen and tacked together how it should go, bribed bb with chocolate to put it on and then let me just repin bits for a better fit. The neckline at the front perhaps a bit high, but no bad thing for a child, the straps perhaps a little bit on the thick side, but wanted then to be comfortable – anyone following this may wish to adjust!


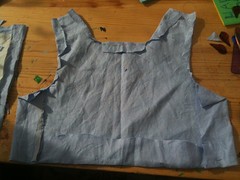
being happy with this, i then cut out the wool – note that i remembered to cut on the fold at the back so no central seam – see I can learn :) . I also cut both wool and linen to have a larger seam allowance under the arm seam, so that in the future i can let out, and also at the waist. but it is ok for the waist to ride a bit high, and you can add a panel strip to each underarm, or one to make a back extensions quite reasonably, as tudor kids often had cut downs and refashioned if not rich. too big an excess would be uncomfortable. I sewed the interlining canvas onto the linen lining. i then sewed with right sides insides the armholes, top and side seams together [ like pourpoint/partlet] and then turned so right side out, checked against daughter and then inverted the bottom to make a good seam and whipstitched along the bottom, whipstitched/ladder stitched the shoulder straps together in 2 parts and the side seams – exactly as did pourpoint and partlet . I the tried on her with fingers crossed and was happy with fit.

bb first try of kirtle bodice

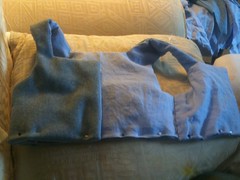
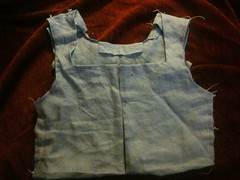
Phew! I then cut out the skirt of the kirtle as one large rectangle that is going to meet at the middle I want it to finish just above the ankle but also have some growth so i add 3 inches to waist to ankle measurement.as a child it can be mid calf, so this should see us for a few years with some letting out. This isn’t lined, so I hem all round the bottom and the top. I don’t do the sides as these are a selvedge :) so I have just backstitch handsewn these together to make a tube, but finished 4-5 inches short of top, as this will be the opening to get it on and off when attached to kirtle bodice.

Dd2 kirtle

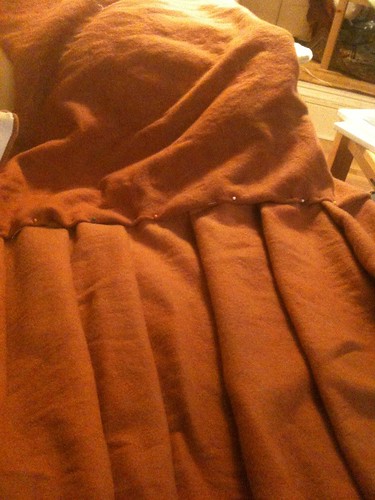
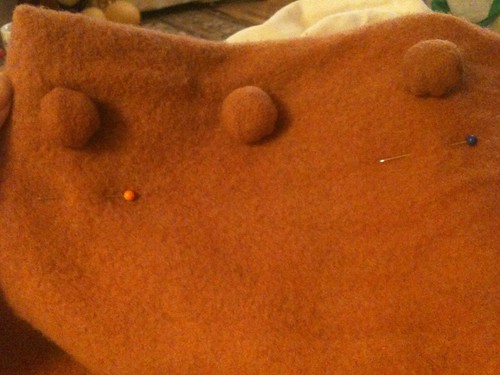
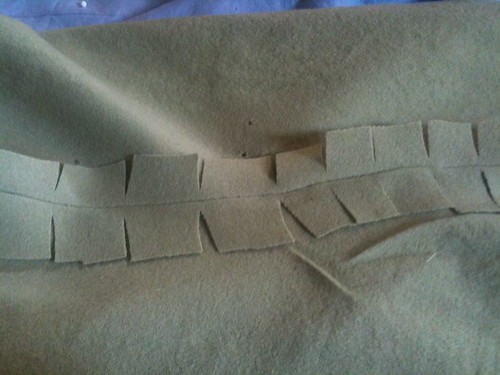
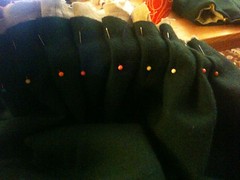
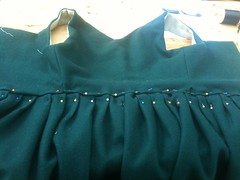
Then I get to the serious business of pleats – I have box pleated and used the kirtle bodice to work out the pleating, leaving an unpleated panel at the front. What i should have done is not sewn up the kirtle skirt and done this flat, and not sewn up the bodice shoulders so that this could also be flat. i then should have learnt from this mistake for next time. but i didn’t. hopefully no one else will make this mistake! Happy with my pinned pleats I whipstitched all along the top to hold them into position. I have a box pleat either side where the bodice side seam is that I can undo when i need to make the waist bigger rather than taking the whole thing off.


Unlined kirtle skirt

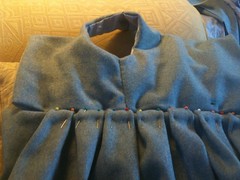
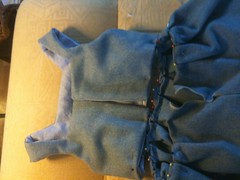
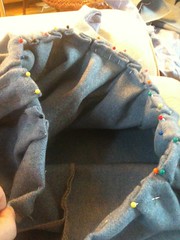
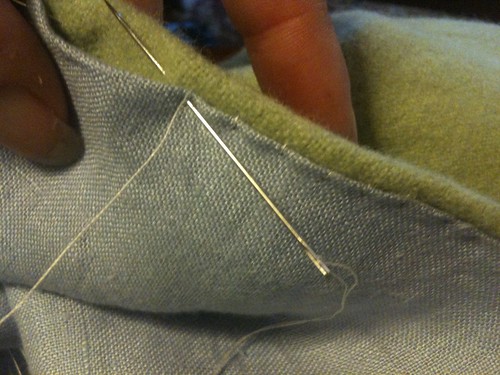
I then whipstitch in 2 layers very firmly with doubled over thread the skirt to the bodice

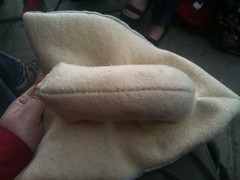
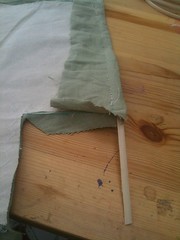
sleeves are next. Tudor sleeves have the seam at the back. There are quite a few complicated diagrams for getting it right. I am, unfortunately, a bit of a bodger! so I measure distance between shoulder and underarm, distance around top of arm, distance around wrist and length of top arm to wrist. I drew a trapezoid shape for upper arm to wrist with these measurements without the seam allowance and then drew a sine wave on top such that the nadir hit the trapezoid 1/4 way along. I cut this out x 2 in linen and x 2 in wool. i forgot to add growth to wrist, and they were slightly tighter than planned. Add a lot of seam allowance to sides! length not such a problem as can add a band to them as she grows if still fit, or make new sleeves. I then sew together the sides of each tube, so i have 4 sleeve tubes. I then place right sides together of linen and wool tubes with the linen outside and the wool inside. I backstitch around the top hole at the seam allowance, snip triangles so it will turn and then turn the linen over so we have the seams all hidden. I fold in at the bottom of the sleeve and carefully stitch around that.


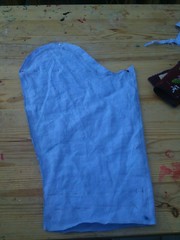
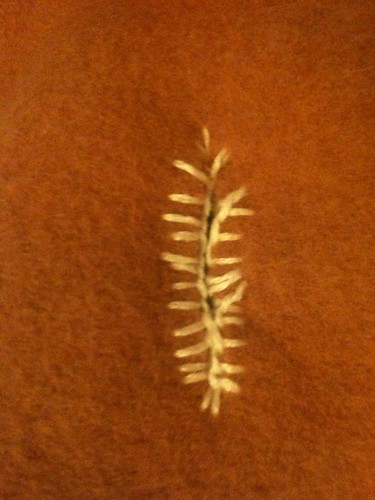
for adding the growth tuck I completely mistook one of the elves and sewed the tuck so that it went inwards and the line shew on the outside. she had meant the tucked material to stick out. I could cover this line with decorative braid, but I haven’t.

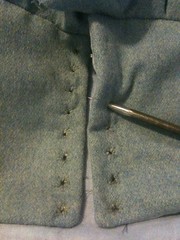
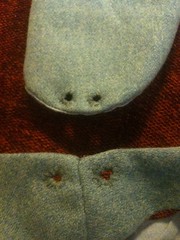
eyelets are a pain. You need to do loads of them! so you either need a broad awl and then pop a pencil through to widen it, or get a wide screwdriver sharpened to a point to stick through. this doesnt cut the material but stretches a hole. then you sew madly and quickly around to hold the hole open. The sleeves should be pointed to the shoulders with lucetted cord by at least 2 points if not 3, but her shoulder is small, so we just used 1

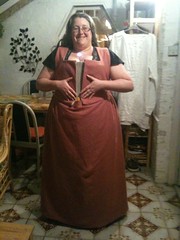
And there you go, one kirtle :)

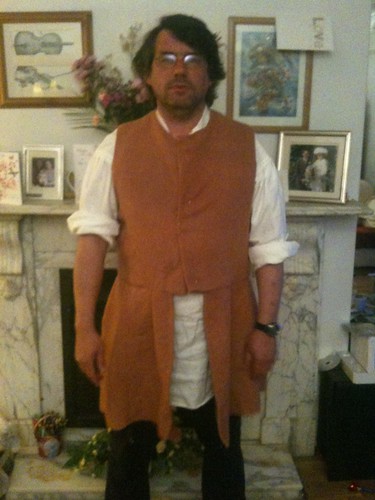
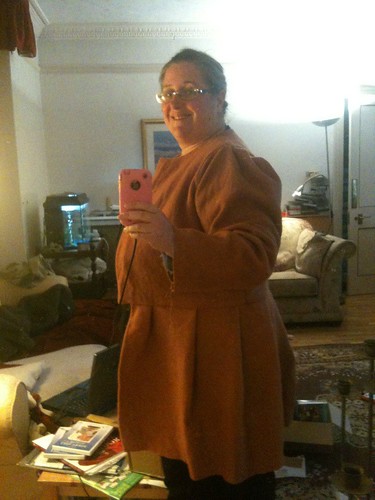
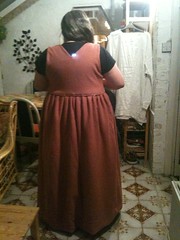
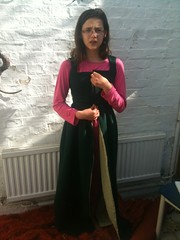
method 2 – pinkish kirtle for me

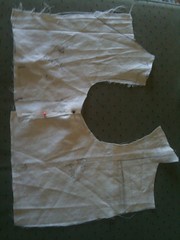
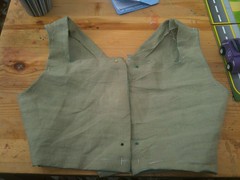
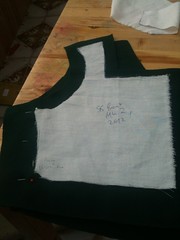
so having made BB’s successfully all hand sewn, mine I had advice from the fab woman who helped [coaxed and cajoled] me through my bodice, and she makes kirtles differently, so I did it her way. And, because her time is v precious, I used the sewing machine for some of it!! She gave me barbie pink wool to dye, i threw loads of brown at it, it came out ‘porphyry pink’ on the farrow and ball chart. a bit errr, and not russett, but hey! [nice clash with petticoat and lining!]. ANyway, she made the bodice toile for me, as it is impossible to make your own toile . i have kept it safe! I cut out the bodice with the linen and then the wool. I used no interlining or boning, since supported with bodies on petticoat underneat. This time I sewed all the linen panels together – ie at the side seams, the wool panels together – at the side seams. I then put right side to right side and pinned carefully and sewed around arm holes and the neck holes leaving the front undone and also the bottom edge. I tried this on over my bodice so as to get the opening lying right, pinned it and then sewed this, leaving the bottom edge unsewn.


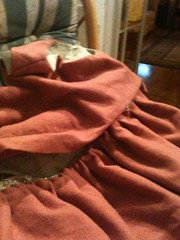
The skirt is a large rectangle, of height from waist to ankle plus seam allowance, and the width was 2m30cm .I then sewed my lining to the wool as a ‘bag’ ie sewed around three sides with right side to right side and then turned inside out. this gave me the hem and also the 2 short sides to whipstitch together. I then did whipstitch these together, forgetting it was easier entirely to do all the pleat pinning with flat material not a tube – sigh!

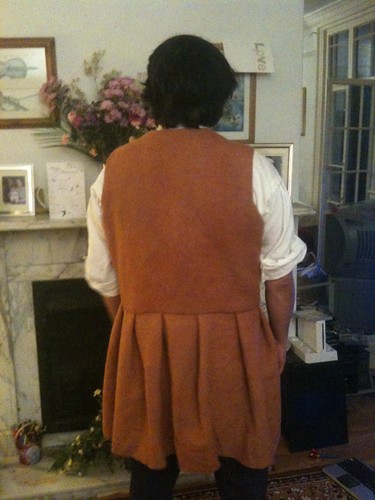
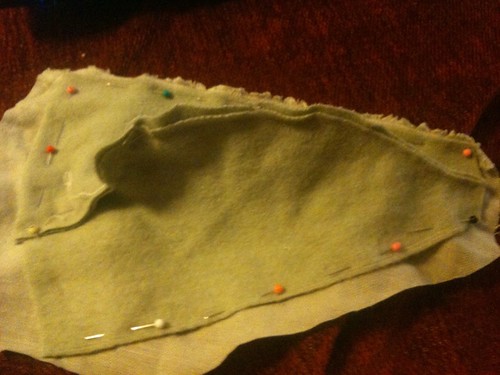
for the skirt, I placed the seam at the side and then pinned knife pleats facing backwards from in line with shoulder strap each side meeting at back. I had some bagginess along the front so that this will get on and off without the kirtle skirt having an opening.

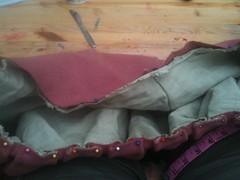
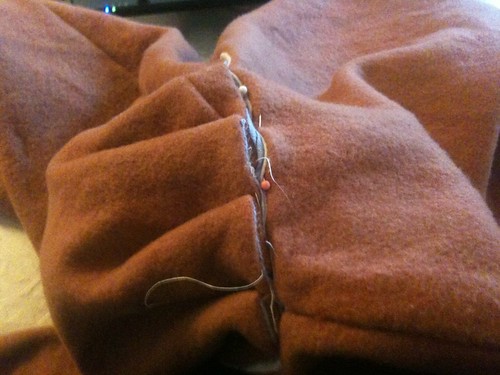
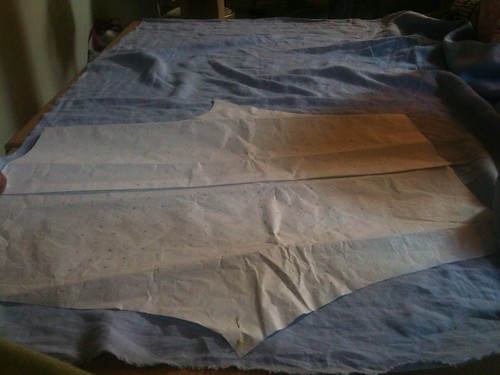
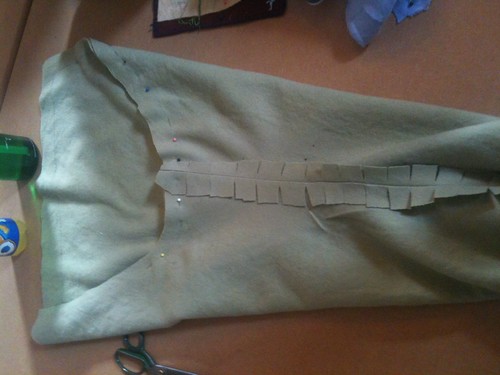
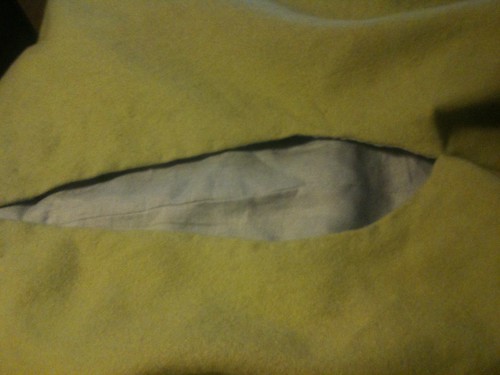
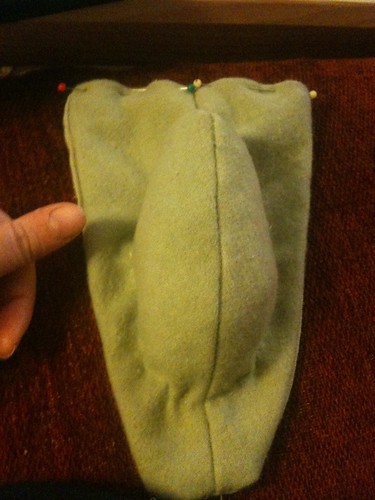
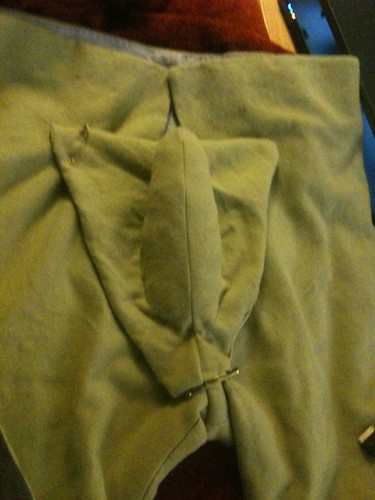
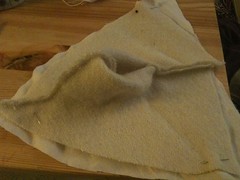
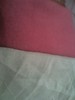
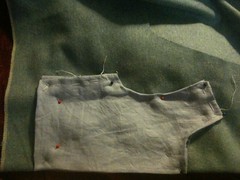
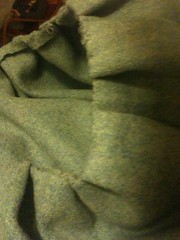
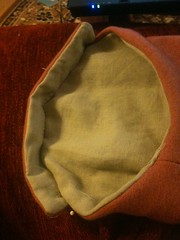
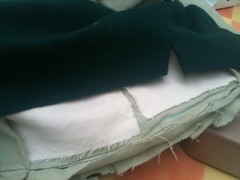
At this point the bodice and kirtle are 2 separate things. now comes the interesting part. i didn’t get the best pic either. Just like the bodice on the petticoat bodies, i am going to pin on and the sew the kirtle skirt to the lining. so i turn the kirtle skirt so that the unhemmed top seam is running against the unseamed bottom seam of the kirtle. this means that for both the waist is at the top end, and the toes of skirt and the neck of bodice are at the bottom end of your material on the table. the right side of the bodice linen is against the right side of the skirt linen. the bodice wool is pulled away so you don’t catch it in your pinning, and the skirt wool is included in the pinning. [ so it goes - wool of bodice pulled out of way/ linen of bodice/linen of skirt/wool of skirt] pin this together and then sew twice along this with sewing machine as long as your sewing machine is heavy duty enough to go over all of this fabric. May be easier to iron first [no plastic headed pins! - yes, i did make that mistake too] sew from first pleat to last pleat, but leave the kangaroo pouch looking bit of kirtle skirt unsewn.

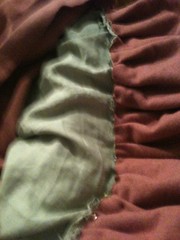
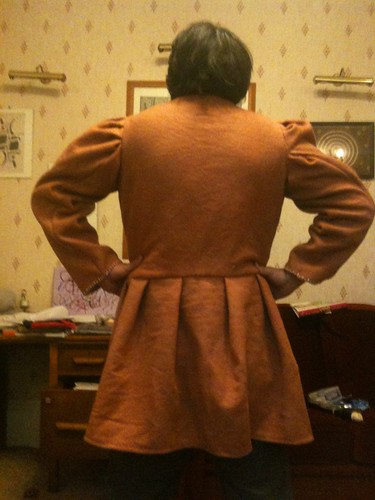
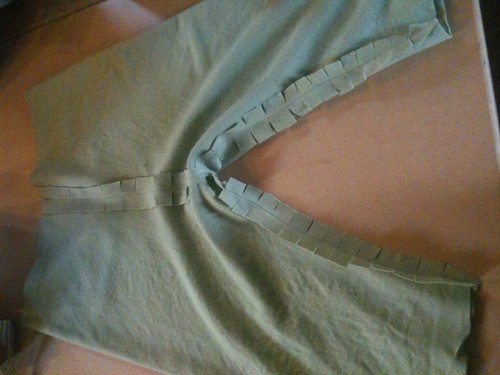
so, with 2 lines of sewing to hold this nice and firm at the seam allowance part, when you swing the bodice up so that you have a kirtle, the wool front will fall over your visible seam allowance, ready for the seam to be rolled under and hand stitched. so if you look the inner looks good, you can’t see the machining on the linen side.

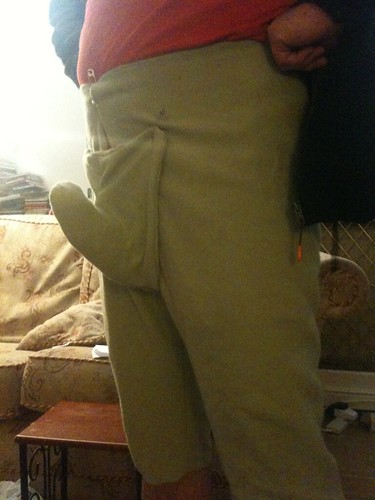
so i then pinned the wool of the bodice to the wool of the skirt and tried it on to make sure all well. also at the bodice between front pleat one side to front pleat the other side the bodice and kirtle aren’t joined, so these need turning in also and sewn over closed.


final pinned fit

sleeves were pretty much the same, tho i had an extra tab bit which holds them better. This turned out to be contentious, so don’t do it, do yours like BB’s! at the wrist end i had a slit for a button and loop, but actually i often wore the sleeve with revers, which looked well enough.

my kirtle sleeves
cuff

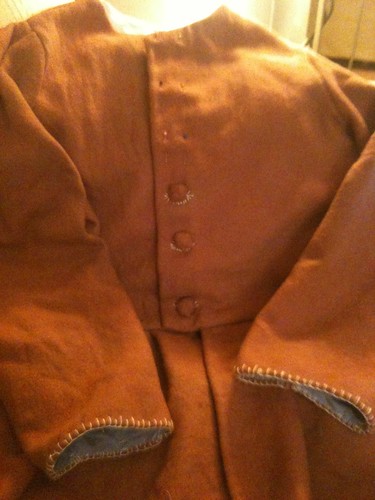
the final job was all the eyelets. we did spiral lacing spacing at the front from the zen of spiral lacing we page [now taken down!] and 2 pairs of eyelets sleeve to shoulder

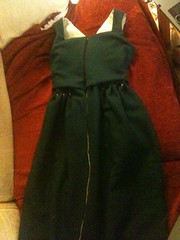
method 3 – sb’s kirtle

actually this was mostly made similar to mine, but without the kangaroo pouch at the front! instead the skirt seam was at the front and had a small opening at the top. also it has a single reed at each side at the front opening so the spiral lacing holds well. no other boning. It also has canvas interlining as the wool more flexible than BB’s

anyway, i started with a toile and then cut out of linen, sewed up and made sure happy with this. i then added the canvas interlining with a stab stitch.


I added the reed support to the front closure [same reed as my reed bodice on petticoat]

then used toile to cut out wool and sewed up side seams of the wool and then right side to right side, sewed the wool and the linen together

dd1 kirtle bodice

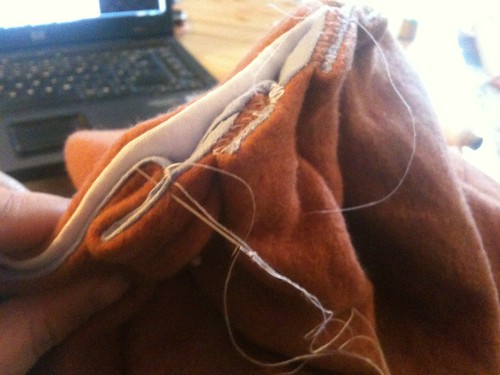
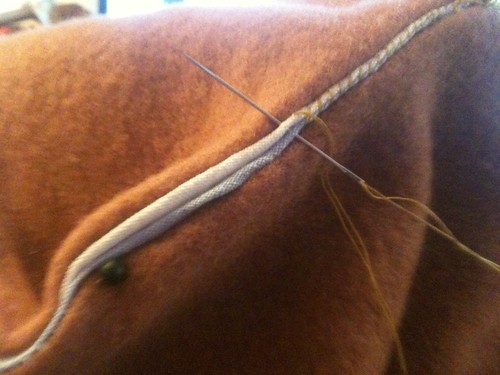
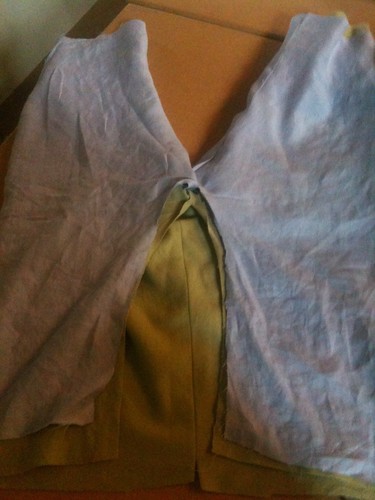
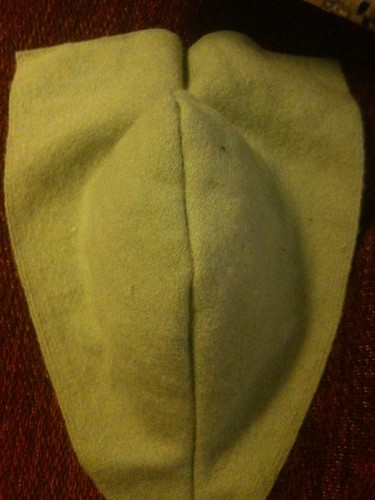
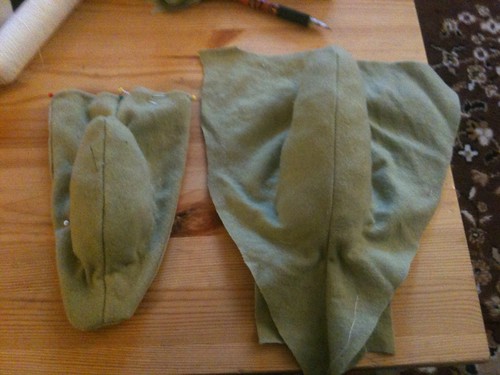
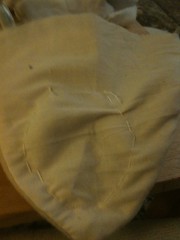
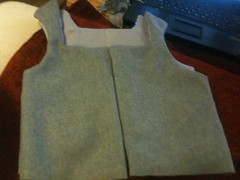
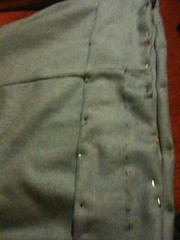
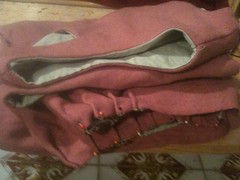
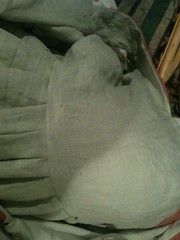
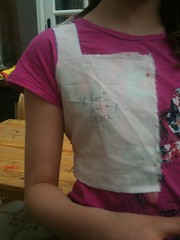
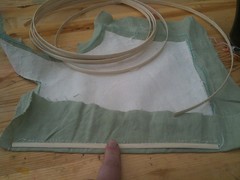
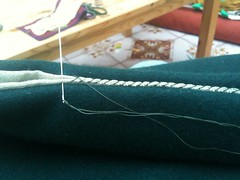
this shows better how i attached the kirtle skirt to the bodice. you can see how all the material is lying together when pinned kirtle skirt against the linen of bodice. I did again 2 sewing lines joining the kirtle skirt to bodice linen to make it strong. The skirt i did as a rectangle bagged, exactly as mine was made using the same measurements of 2m by waist to ankle plus seam allowance.


sb then tried it on so that we could make sure that the pinning of outside wool looked good – and in fact i did adjust it.

pinned and pleated kirtle on
then sewed up the front slit

final touches were eyelets for spiral lacing and then sleeves and 2 pairs eyelets made along the lines of BB’s. I also did a tuck to take the length to above ankle like i did BB’s.

i hope that is all clear?