
Just reminding that for costume making I will be following the tudor costume page fairly slavishly and begging advice from k at deependers on materials suitability and nearer the time costume elves [!] for the difficult bits [ie kirtle bodice ] I am currently not a re-enactor, but have visited Kentwell [see preamble] and we are really keen as a family to join the tudors. I plan to make a shift and petticoat for each of us girls, a shift for DH by Xmas. This is also a good site to read up on what to do. Other people I know have found the mediaeval tailors assistant to be really helpful for shifts, or the tudor tailor.
This means that the steps detailed here are not originating from my brain, but the tudor costume makers, though some of the mistakes and how to avoid unfortunately did :blush: .
NB Anyone thinking of making clothes for re-enactment, please check with your group the ‘rules’ on materials, colours and look. different tudor years have different styles – tho less so for poor, especially poor kids. following these notes does not guarentee acceptance of clothing by Kentwell or any other group, but may help a total novice such as myself. I had never made any clothes before these – a hint of my novicitude. Also, with shifts there are a variety of neck finishes – square, simple or collared and cuffed – potentially with ruffles. You might need to know which youa re expected to do. otherwise, you could go as far as making the neckline bit and then wait until you do know. I wrote this initially in Sept 2011, but have added in the things that had I had known I would have done differently – mostly in italics ![]() . however, the clothing was passed for Kentwel 1556 . i have also been told that a run and fell or a french seam would be stronger for shift seams, but is a bit beyond me, and the seams of my shifts did hold
. however, the clothing was passed for Kentwel 1556 . i have also been told that a run and fell or a french seam would be stronger for shift seams, but is a bit beyond me, and the seams of my shifts did hold ![]()
Second shift – SB’s older girl’s shift
Materials and Measuring
I am using a 100% irish linen in white rather than unbleached. This is what i could find that was 100% linen in the affordable range. Apparently unbleached goes whiter and whiter with use. These are going to be therefore much used shifts ![]() it has been hot washed 2ce and dried, so shouldn’t be more shrinkage [I hope!] It is not at all bluey in real life, even if it does looks so on photos. Hot washing does shrink the weave and tightens it. Ivory white for lower classes or natural is probably better than whitey white.
it has been hot washed 2ce and dried, so shouldn’t be more shrinkage [I hope!] It is not at all bluey in real life, even if it does looks so on photos. Hot washing does shrink the weave and tightens it. Ivory white for lower classes or natural is probably better than whitey white.
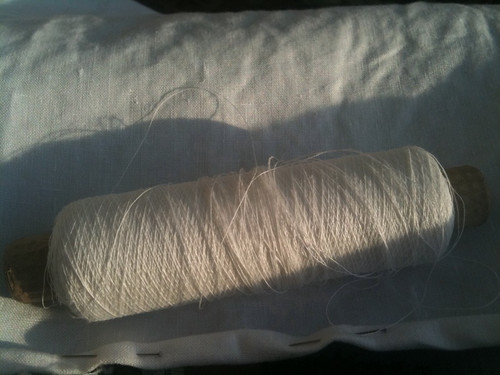
having been to a reenactment recently, I picked up some linen thread, a white 2 ply and an unbleached 3ply. I am using the 2 ply for hemming and the 3ply for whipstitching.
I measured up using the Tudor costume page to SB’s mid shin – 42″ and around her chest at 34″ made it looser to 38″ so overall as a rectangle i wanted 84″ plus hem margins [seem to be an inch per hem when i do them] by 14 inches plus hem margins. I managed to measure once and so have to cut twice though! forgetting to halve the width. luckilly, it is perfect for me, if a bit knee length! so instead, I have cut AGAIN the right measurements of 86 x 17. SB wants more voluminous sleeves with a cuff, so the arms were more generously cut than before.
Hemming and Pinning
Initially I followed a very similar path to the first shift . I hemmed the body rectangle along its 2 long edges having pinned first Then I hemmed each arm on the 2 long lengths and 1 short length [ie 3 sides] I have actually got a bit bored of hemming, so i kinda running stitched all of them except where they would show accross the shoulder :blush:
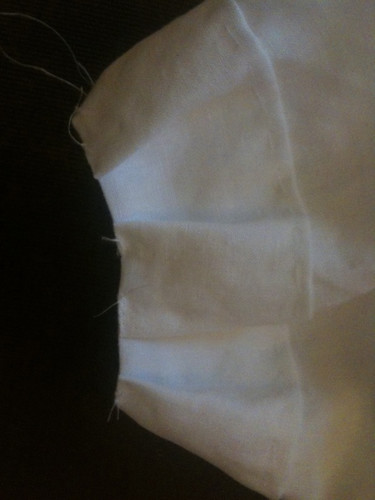
instead of adding some knife pleats to the top of the sleeve I have done box pleats as these are also apparently authentic, and then i don’t do the front/back mistake that i did with the last shift ![]() I did 2 small box pleats in total.
I did 2 small box pleats in total.
As before I then placed a pin at the midpoint of each longside of the body piece, and the midpoint of the hemmed short side for each arm, and lined these up. i pinned them right side to right side, with the midpoint pins lining up so that each arm was securely on, and checked that the arms weren’t going to be sewn in the wrong way round, as this is apparently a very easy and common thing to do. [and i am good at making mistakes!] . i then whipstitched the arms onto the body.

Underarm gores
I have cut these out at 6″ as recommended for adults, but my hemming means that they are 4 ” square for sewing in. I then used these squares to make a diamond shape under the armpit with the bottom 2 sides of the diamond being sewn to the sides of the body, and the top 2 sides of the diamond sewn to the underarm seam of the arms. Makes a lot more sense with photos!
Making the neck hole
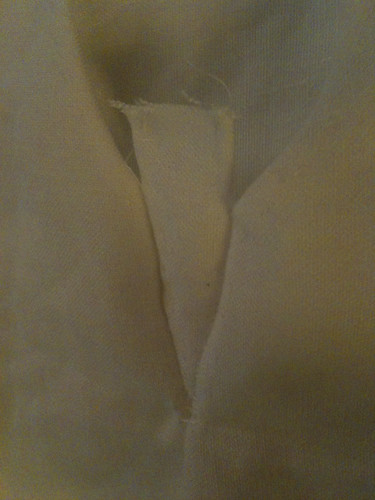
I added hole so that SB could try on, following the steps in the tudor costume, making it 6″ transverse and 4″ vertical and ensuring that i had the midpoint again. once this was done i shaped the neck hole and v finely hemmed all round it, just like for BB’s . However, SB would like to have a collar and tie. So following the Tudor Costume design I cut out some little rounded triangles to put on the shoulders to collar, having hemmed them, whipstitched them into place.
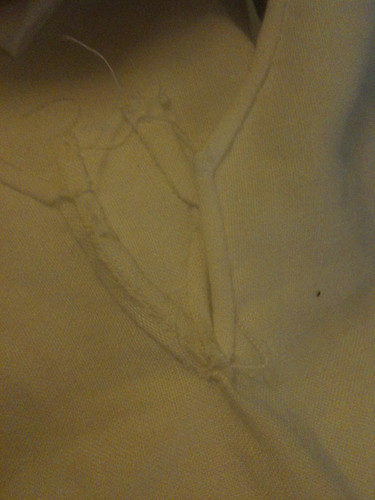
I retried on the shift at this point and it was tight around the neck! so cut a longer vertical incision, and hemmed again. Now it fits!! The sleeves also appear to be slightly off the shoulder in look, and I don’t know if this is a problem?? I just need to finish it off with the collarA final collar made of material 2 inches longer than the collar circumference, and 4 times the wished for width and I need to make the laces. I am going to leave collar and other bits until i see what leftover material i have from the next shift ![]()
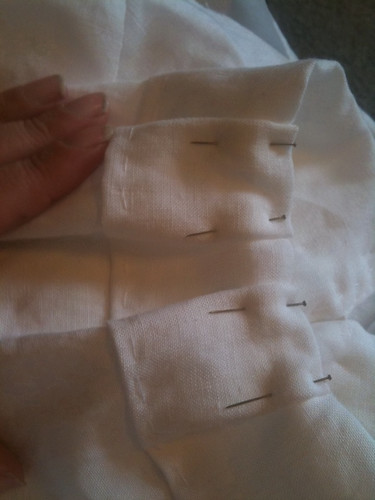
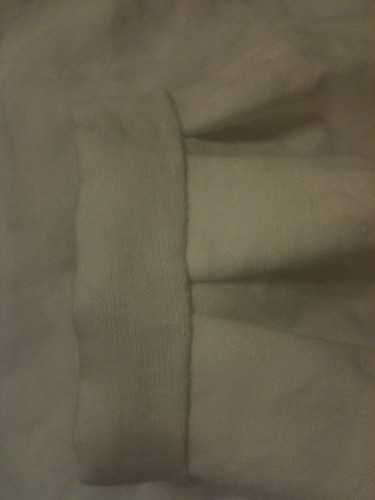
Making the cuff
I did nice long cuffs, so there was quite a turnback to hem. Then I knife pleated around so that the cuff was loose enough to pull over the hand without untieing if required and pinned, and then oversewed the tops of the knife pleats so that they would hold. A cuff band was formed, like the collar, of material 2 inches longer than the cuff circumference, and 4 times the wished for width, this was then folded in a ‘valley fold’ – ie each long edge to the middle. A bit like the waistband of the petticoats, the pinned sleeve was sewn to the inner of the cuff, this was then folded over on the middle axis, and carefully stitched down on the other side too. Having done it, I wonder if the cuffs are too loose??
Sewing up the sides/triangular side gores
I have sewed to SBs thigh and she can still pull on and off the shift, so tempted to leave it unsewn rather than put in triangular side gores. This is prob dependent on how much material i have left after making the next shift!
so, current state of play is that it needs a collar, 1 cuff and potentially side gores. but, as don’t have off cut scraps at moment, going to wait until i do to cut out collar and cuff, and decide side gores at the end. I did attach cuff to other side exactly as I did this one, and then collar, and had a linen tie for collar and cuff, but seem not to have taken any photos at all!
advice – what needed to be firmer? definitely the linen tape to tie closed at the wrists. it needed to be much much much more firmly sewn on. I also didn’t quite get the neck shape right, but was good enough
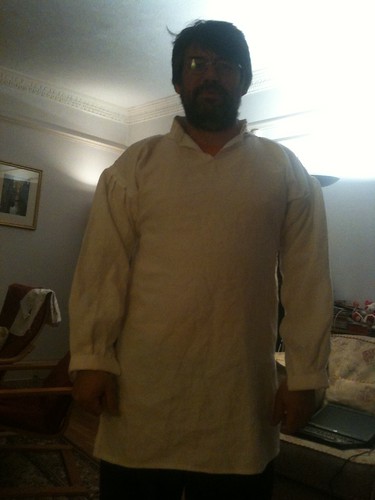
I went on to make her a simple shift, myself and my dh each a collared shift and a simple shift, though all mens shifts should be collared and cuffed. For his shift, it is finished at upper thigh so that the hose aren’t revealing ![]() . you need a minimum of a shift per 2 days in the ideal world. if it is sunny, the washerwomen at kentwell can wash and return you a shift in 2 days, so you might get away with 2. however… the more the better really.
. you need a minimum of a shift per 2 days in the ideal world. if it is sunny, the washerwomen at kentwell can wash and return you a shift in 2 days, so you might get away with 2. however… the more the better really.
Variations upon a theme
note how the shoulder droops off. it is even worse for me! as the chest measurement is a lot bigger than the shoulder, so with each i retrofitted a trapedoid shape by tucking it in from the gore diamond at the armpit so that it took in about 3 inches by the time it got to the shoulder. it would have been easier to do this shape from the start for adults I think, which is what is suggested in the mediaeval tailors assistant and in the tudor tailor.
you might like to make sure sleeves can be pushed up higher than elbow and stay there. Dairy lady had to cut stitches away on C’s shifts.
PS all your costume making is totally amazing.
thanks for tip should be able to push sleeves up
Looks good Doesn’t need a colar, uness SB specially wants one. Only Bob has collars; all the rest of us have teeny tiny hems…
she would like a collar, so will prob do one, as did tht inserty bit so could make one! if i make her a second shift it will have a far more plain appearance and be more like bb’s